Welcome to the Do-It-Yourself guide to building a life insurance website on WordPress.
We’re going to be showing you step-by-step how to build a life insurance website for less than $80 (+ $7/mo paid to your host) that looks like this:

If you can follow directions, you’ll be able to create a site that looks just like this with this tutorial. (Yes, we’re literally going to walk you through it step by step).
You’ll need to buy a domain ($10), hosting ($7/mo), WordPress Theme ($55) and instant quotes (optional). We’ll show exactly where and how to do this.
It’s a lot of information below, but it’s VERY easy. Take it step by step and you’ll have a site up and running with less than 1 hours work.
If you get stuck on any step, we support any agent that’s in the community. Just create a topic on what you’re stuck on and we’ll troubleshoot for you.
Everything recommend below is EXACTLY what we use. So lets get started!
Step 1: Register a domain
Go to Godaddy.com and register a domain name. This will cost less than $10.

When choosing a domain name, here are a few tips:
1. Make it as short and as memorable as possible.
2. Try and get the word “life insurance”, “life”, “term life”, “whole life”, “coverage”, “quotes”, “rates” etc. in your url. You’ll get more people clicking on your URL in the search engines because they see what they’re looking for in your url name.
3. Consider a niche. Find a domain in this niche and target that group of people – like military, skydivers, diabetics etc. There are 1,000’s of niches. Be the “go-to” guy in the industry for a niche. That way you can find very targeted traffic to your site (more on this in several podcasts and in the community).
4. Try to buy a “.com”. If you have to buy a “.net”, “.org” or whatever, make sure there’s not a live life insurance website on the .”com” or else they’ll get some of your business from people trying to find you.
Advice when checking out and paying with Godaddy:
1. You don’t need to buy “domain privacy”. Just know that people will see your name and e-mail as the owner with simple “WhoIs” searches. It’s not a big deal. You can always add it on later if you want.
2. Don’t buy hosting from GoDaddy. I’ve found their hosting to be slow and limited in it’s capabilities. I also experienced my website being down more often than other hosts. When you’re checking out with your domain name, they’ll try to upsell you. We’ll go over hosting options next.
3. Don’t “add e-mail” to your domain. We’ll show you how to do that through Google Apps (Gmail).
Step 2: Buy Hosting
Now that you have a domain, you need to find a reliable server to host it. In this step, all you’re doing is purchasing hosting with 1 of the 2 choices below.
SellTermLife.com and all my life insurance websites run on WPEngine.
![]()
Why? Because they’re blazing fast, reliable (99.9% uptime) and backup my site automatically. You can also clone any site you host with 1 click (great when building multiple sites). I highly recommend them.
However, WPEngine is more expensive than shared hosting options, but it’s worth it if you’re serious about marketing your life insurance website. For 1 website, it’s $29/mo (cheaper if you pay annual)
I recommend BlueHost if you’re on a budget.
![]()
They’re easy to use, have great support and have some of the most reliable shared hosting available on the net. They’re $7/mo. and you can always pay someone to move hosts later. So you’re not locked into this decision.
Once you purchased your hosting, you need to update your nameservers on your domain to point to your host.
Step 3: Connect Your Domain and Your Host
You do this through changing your nameserver records within Godaddy.
I know this sounds “techy”, but it’s actually very easy and there’s step by step guides to walk you through this. It shouldnt’t take longer than 10 minutes.
Here’s how you do this for WPEngine (best step by step tutorial I researched)
Here’s how you do this for BlueHost:
1) Log into your GoDaddy.com account. Click “Domains” and you’ll see all the domains you’ve purchased from GoDaddy. (see below)

2) Find the domain you want to host and click “launch” (see example below)
![]()
3) Under Nameservers, click “manage”. (see below)

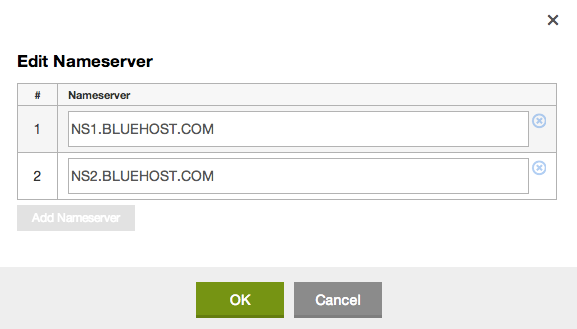
4) A pop up will come up. Click on “custom” if it’s not already checked off, then click “Edit Nameservers”
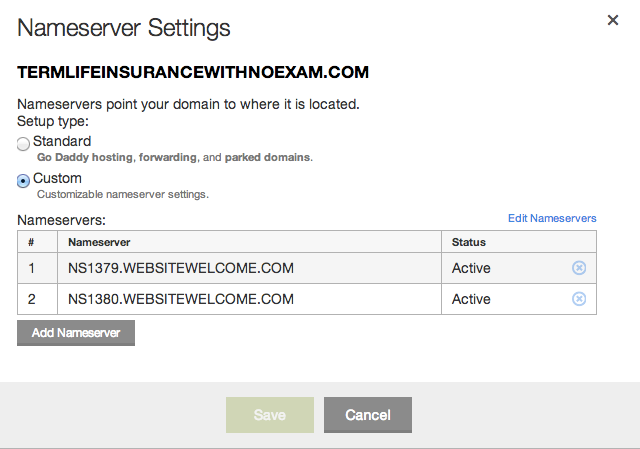
5) Change the nameserver settings to NS1.BLUEHOST.com and NS2.BLUEHOST.com and click “ok” (see below)
6) Then click save (as seen below)
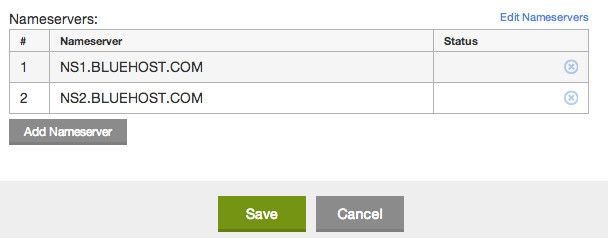
That’s it! Allow a few hours for the nameservers to propogate – although it usually takes less than 30 minutes (but I’ve heard it taking up to 24 hours). Then move on to install WordPress.
Step 4: Install WordPress
Now that you’ve pointed your GoDaddy.com nameservers at your host, we’ll be installing WordPress now and it’s VERY easy. Just a few clicks.
The good news is WordPress is already installed if you use WPEngine. So you don’t need to do anything if you chose them as your host. You can skip this step.
Here’s how you install WordPress in BlueHost:
1) Log into Bluehost using your user id and password. It will take you to your cPanel.
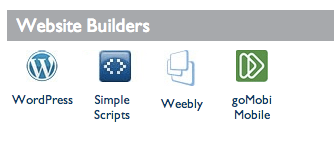
2) Under “Website Builders”, click “WordPress” (see below)
3) It will re-direct you to “Mojo Marketplace” (don’t be alarmed). Then you’ll land on the WordPress page where you’ll click “Install”. (see below)

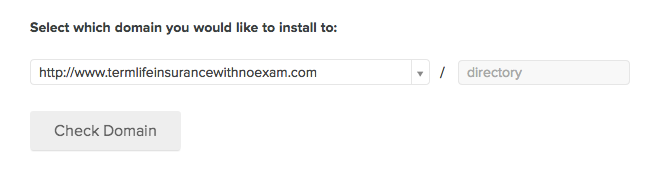
4) Choose which domain you want to install and click “check domain” (see below)
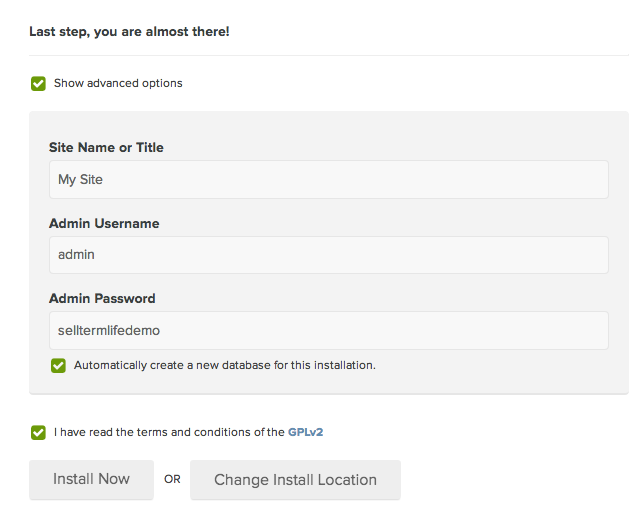
5) After processing for 30 seconds or so, click the box that says “advanced options” and choose a username and password. Don’t worry about the Site Name or Title, you can change that easily within WordPress. Then check “I have read the terms and conditions”. Then click “Install Now” (see below)
In about a minute, it will redirect to the next screen (where Bluehost tries to upsell you templates – don’t buy any of these) and on the top of the page you’ll get a message that says (see below)

You’ll get an email confirmation from MOJO Marketplace as well: (see below)
![]()
Your WordPress login URL is easy – just add “/wp-admin” to the end. So for this example, it would be www.termlifeinsurancewithnoexam.com/wp-admin. In the e-mail above, it will give you your admin login as well.
That’s it, you’re done!
Now it’s time to pick a premium theme.
Step 5: Pick a theme and install it to WordPress
There’s a lot of WordPress themes on the market. I’ve purchased dozens of them. The Salient Theme found on Theme Forest is by far the easiest and most customizable theme for beginners to learn. Out of the box it looks VERY professional and it’s able to do just about anything. Not to mention it’s cheaper than most WordPress Themes.
Purchase the Salient Theme from Theme Forest here. ($55)
Once you’ve done that, we’ll need to upload it to WordPress.
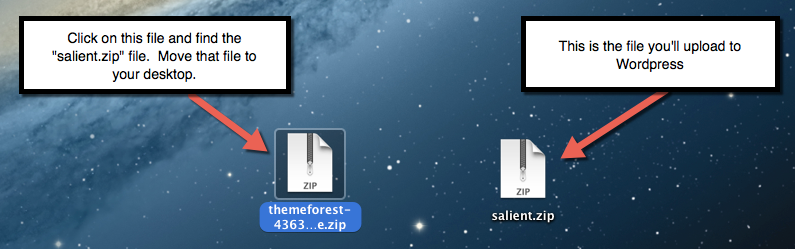
1) First you’ll need to find the downloaded ThemeForest.zip file and take out the file that says “salient.zip” and place it on your desktop (or anywhere that’s easily accessible to you). Like this:
2) Log into your WordPress admin area, Just add “/wp-admin” to your URL and type in your username and password.
3) On the left side panel, under “Appearance”, click “Themes” (see below)

4) Click “Add New”
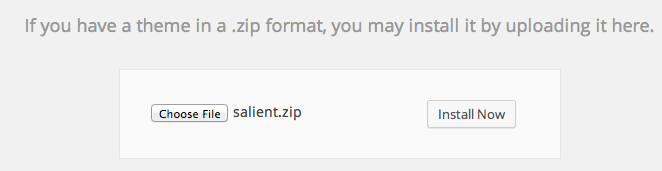
5) Now we’re going to upload the theme we just purchased. So click “choose file” and then find the “salient.zip” file that you downloaded. Click on it and then click “Install Now”. (see below)
6) Click “Activate” once you’ve successfully installed your theme.
Now comes the fun part – customizing your theme!
6) Customize your Theme
Below is a tutorial to customize the Salient Theme to look like this:
You’re done!
Like I said in the video above, this theme is VERY customizable if you want to continue digging in and customizing even more.
Just remember – SIMPLE converts better than a cluttered website.